The following is a review of the new 5D Mark II based on my personal experience using the camera for 2 weeks in Rwanda and Kenya. I also include photos from my trip to give you examples from the 5D Mark II, as well as to share some of the things I experienced on my trip. I made a very significant upgrade from the Canon 10D which I purchased in April of 2003. I also have some experience with the Canon Rebel XTi, which I borrow from time to time from my wife. For about 25 years before going digital with the Canon 10D I had been using an old Minolta SLR purchased by my father in 1971 andgiven to me when I was 6 years old.
I decided to start this review a little differently, beginning with what I think are the most important conclusions. A large percentage of people just skip to the bottom anyway, so I thought I’d save you a bit of scrolling. The following are the four main discussions I have heard surrounding the 5D Mark II: Do I really need a camera that can shoot at ISO 25000, Do I really need a camera with 21 megapixels, Do I really need these fancy “extras” that comewith these more expensive cameras, Should I buy Canon or Nikon?
Nikon vs Canon Lets start with the last question. I am a Canon owner and have never used a Nikon. I have no idea which is better. I assume neither is perfect and some things are better when it comes to certain Canon cameras and some things are better when it comes to certain Nikon cameras. Since I will not be comparing Nikons to Canons in this article you probably will not get an answer to this question. What I do hope you come away with is a perspective of the Canon 5D Mark II given by a life long camera hobbyistwho especially enjoys taking travel photos.
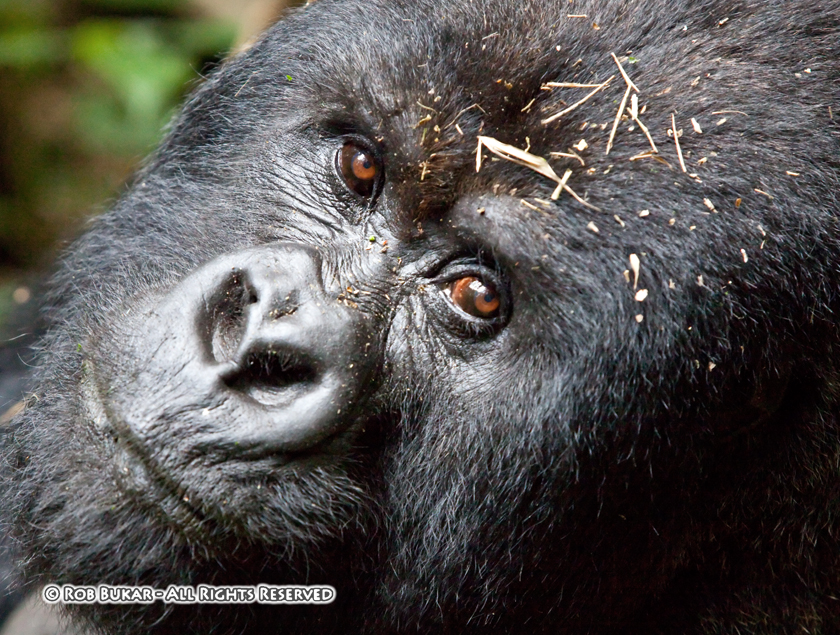
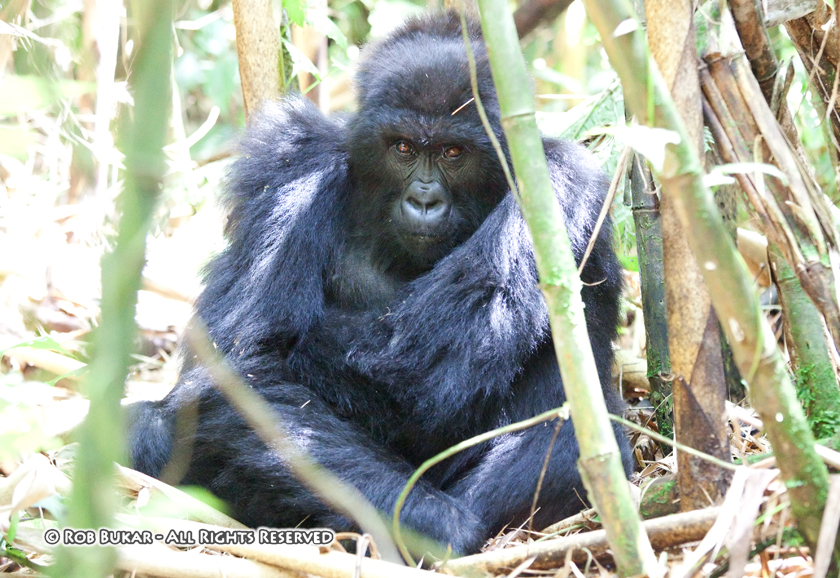
High ISO shooting To me the number one reason to purchase the 5D Mark II is it’s ability to take fantastic looking photos at high ISO. In my opinion shots at ISO 6400 are outstanding and it is even possible with some Photoshop work to get usable 12600 ISO shots. ISO 25200 is also fun, who isn’t amazed at taking photos in the dark and then looking on the back of the camera and seeing things your eyes have no chance at making out. Take a look at the photo below.. This gorilla was shot at ISO 6400. I personally am still floored when I look at the quality of this photo at ISO6400.
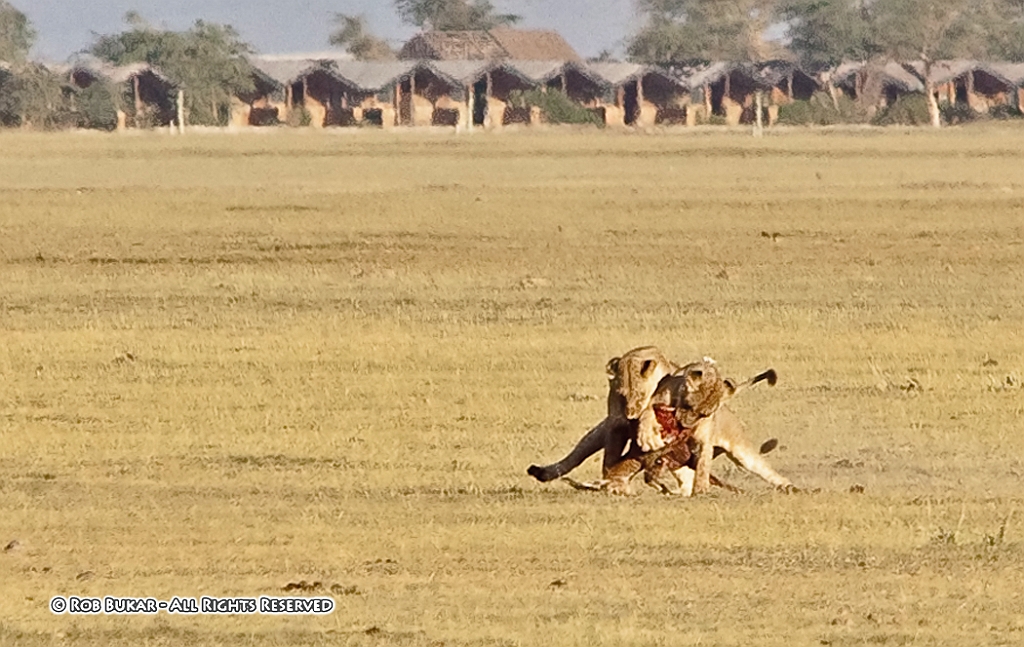
I have heard some people say that they do not need a camera with amazing high ISO functionality, because they like to shoot at closer to 100 ISO and/or use flash. I’m sure this is true for some specialty photographers, but for your average user, especially for those who love to shoot travel photos as I do, there are often times and places where you have no choice but to either use high ISO or lose the shot. When shooting the gorillas in Rwanda flash was not allowed; gorillas move around making it necessary to shoot at higher shutter speeds; and the gorillas we visited happen to be in an area that had incredibly thick foliage. Even though it was a nice clear day, it was quite dark where the gorillas were. Many of my shots were taken at ISO 6400, 1/80, F.2.8. My choice was either to use ISO 6400 or not get any useable photos of the gorillas. My wife was using her Canon XTi on the trip and set her camera to ISO 1600 since she knows that photos taken at higher ISO on that camera don’t look very good. She ended up getting virtually no usable shots. Others on the trek were using point and shoots. They had no way to get a usable photo in the conditions that presented. Most of the people with point and shoots ended up shooting video the whole time in hopes of getting something to take away with them. The 5D Mark II allows you to capture images in situation where virtually any other camera on the market would not. 21 megapixel What do 22,000 megapixels give you? They give you the ability to either print photos very large (above 13”x16”), or the ability to crop the heck out of photos, thereby “enhancing” the focal length of lens you are using. Personally, I am excited at the prospect of seeing what a larger print will look like with the Canon 5D Mark II. As of writing this article I haven’t made any prints from photos taken with the 5D Mark II. When it comes to cropping, I have had the chance to crop the heck out of some photos taken on Safari in Kenya. My most powerful lens combination is my Canon 70-200mm 2.8 IS used with Canon’s 1.4x extender, bringing the maximum focal length to 280mm. This is really less then ideal for a safari, but I have never been willing to invest in a bigger piece of glass, because how often will I really need it? I don’t go on safari’s everyday. I was hoping the 22mpixels of the Canon 5D Mark II would compensate for my less then ideal lens selection and I was not let down. The photo below was taken at 280mm and the lions were more than 200 yards/meters away. It's heavily cropped and is actually show at 100% view. Even with a 400mm lens the photo would have needed significant cropping. The 22megapixels allowed me to significantly crop this image and retain an interesting (though gruesome) photo that I would not have otherwise been able to show off. You may not want to have to crop this much, but sometimes you have no choice. The 5D Mark II again allows you to capture an image that would be unusable if capturedwith most other camera on the market, if you are focal length limited.
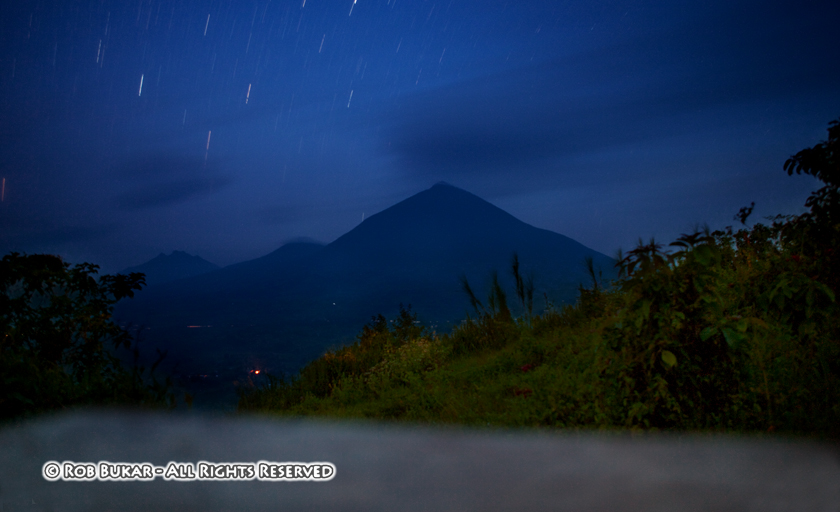
Extra’s: When I talk about extra’s I’m referring to conveniences that the Canon 5D Mark II offers over lower model cameras or older model cameras. The conveniences are things such as, permanent ISO listing in the viewfinder, a top and rear LCD, large/bright viewfinder with 98% coverage, rear control dial, Multi-controler joystick, customizable control on the command dial, customizable menu, custom functions, etc. I call these extras because their purpose is more to make the experience of using the camera more pleasant rather then to allow you to take a photo that no other camera can take. People will have to make their own decision as to if these extras are worth the added cost. A lot will have to do with how often you use your camera and how important the whole experience of usability is to you. Below I will give you my personal feelings on some of these extras, as well as some of the other functions and features of the Canon 5D Mark II. Viewfinder The Canon 5D Mark II’s large bright viewfinder with 98% coverage is a pleasure to use. Looking through the 5D Mark II viewfinder and then my wife’s XTi viewfinder, there is no comparison. I rarely use manual focus and the viewfinder will likely play a very small role in determining the quality of my photos, but the increased pleasure when looking at the world through a very nice viewfinder does have some value. I don’t know what the price is, but I am personally willing to pay something extra for the pleasure. Permanent ISO in Viewfinder This may seem like a minor feature for some, but to me it is major. I can not count the number of times, when using my 10D, that I was shooting away not realizing the ISO was set to a high level, when it was completely unnecessary. This lead to shots that were grainer then they had to be. Over the years I instinctively began to realize when something was aerie, when I noticed my shutter speed and/or aperture settings were much higher then I expected, but this wasn’t full proof. Unwanted high ISO shots are less of a big deal with the Canon 5D Mark II because of it’s superb ability, but I still prefer to shoot at lower ISO if I can, or to at least make an informed decision. Having the ISO on display in the viewfinder leads to far fewer errors of this type. Rear Quick Control Dial When using my wife’s Canon XTi, my biggest complaint is the awkward way you must hold in one button and turn the top dial when you want to enable exposure compensation. The rear control wheel is a much nicer solution, and it works very nicely when scrolling through photos. I use exposure compensation and full manual control quite often, and it’s a pain in the neck if you don’t have separate control wheels for exposure and shutter speed control. I am definitely willing to pay some increased cost for the addition of this extra control wheel. Rear LCD Who could not love the rear LCD on this camera with it’s large 3” size and 920,000 pixels. The clarity is amazing. The auto LCD brightness control seems to work great as the photos are easily viewable in bright light and reflection is not a big problem on this LCD. The rear LCD has many functions. As a screen to preview photos the LCD image quality is superb. When zooming 10X the detail is remarkable and the screen can truly be used to let you know if a photo is sharp. This feature is a must have because you will immediately know when you need to reshoot or not. The LCD is also used to play back movies. Movie playback on the LCD is rich and smooth and wonderful to watch. The added speakers in the camera also add to the movie playback experience. The rear display is also where the main menus are set on the camera. Again everything is bright and clear and easy to read even in bright light. The rear LCD is also used for Live View and for shooting movies. I’ll talk a bit about this later. Quick Control Screen The LCD is also used for another incredibly useful feature found on some of Canon’s recent cameras, but is new to the 5D and new to me. This is the Quick Control Screen. Important parameters such as aperture, shutter speed, ISO, exposure compensation, auto-focus point selection, picture style, white balance, light metering, battery life, number of remaining photos, and image quality are displayed and can be changed when viewing this screen. I found it very useful to use this display to view many parameters quickly, but I usually changed most standard parameters such as ISO, shutter speed, and aperture, using the standard camera buttons and the top or rear control wheel, while looking through the viewfinder which is much quicker when you’re about to take a shot. When not looking through the viewfinder, or needing to view information not found in the viewfinder such as metering mode or focusing mode I still usually used the top LCD to make these changes. I’m not sure if it was out of habit, since this is how my 10D worked, or it’s just more natural for me. I have consciously tried to use the rear display and a combination of the quick control dial and multi-control joystick to view and make the same changes and it seems equally effective. Overtime it may become my primary method. There was one point where modifying parameters using the rear LCD came in very handy for me. I went out at 5AM to shoot some long exposures in the dark. At first I used the Top LCD with the light button so I could change my settings, as I did with my 10D, and then remembered the Rear LCD's ability. In the dark it was so much easier to use the rear LCD as the light keeps going out when using the top display and it is just so much easier to see the rear display and all your settings at once in the dark, make changes, and recheck. Even if light levels are just low as opposed to complete darkness, the rear LCD is optimal for viewing settings as it is much brighter and easier to see compared to the top LCD, and you never have to utilize that light button on the top LCD that only turns on for a few seconds. There seem to be so many nice features in this camera that makeit a pleasure to use.
Multi-Controller Joystick The multi-controller joystick has multiple uses as well, and custom functions allows it to be set in a variety of ways giving it great flexibility. In image playback it is used to move around an image when previewing a photo at higher magnifications. When shooting, by default the joystick is programmed to activate the quick control screen and enable changes to the various parameters. Custom Function III-3 when set to option 1 changes the function of this joystick. When utilizing this custom function the joystick takes over the function of the auto focus selection button and is used to quickly select auto focus points. Pressing it in the center chooses the center only auto focus point, and pressing the original auto focus selection button will now only enable automatic AF points. I find this combination an incredibly fast way to switch between auto focus points, especially when going between automatic AF selection and center AF point only. The joystick works great in my opinion and again is one more nice feature that makes the camera a pleasure to use. Custom Functions I’m not going to go through every custom function, but I’ll tell you which parameters I changed from the default settings and why.
CFI-2 ISO Speed Setting Increments – I set it to 1 stop because I’m always suspicious as to how 1/3 stop is achieved.
CFI-3 ISO Expansion – I set it to enable ISO 12800 and 25600. Why not? ISO is now permanently displayed in the viewfinder, so it is much harder to make a silly error.
CFII-1 Long Exposure Noise Reduction – I set it to Auto. The manual says this setting is the most effective, so why not.
CFIII-3 AF Point Selection Method – As I said above I find the Multi-Controller joystick to be the most effective method for controlling auto focus points.
CFIII-7 AF Point Area Expansion – This enables the 6 (invisible) assist AF points when AI Servo AF and the Center Only AF point is selected. I use the center AF point 90% of the time, because often objects closer to the camera will be the focus point when automatic AF selection is selected. But if I’m in servo mode, I’m probably trying to track something, so I prefer to have the added benefit of the 6 (invisible) assist AF points.
CFIV-1 Shutter Button/AF-ON Button – I set this to Metering + AF Start/AF Stop. There have been times where I have achieved perfect focus, but needed to press the shutter button half way to keep the exposure metering going. This feature allows me to do this without having the focus change.
CFIV-3 Assign SET Button – I set this to enable the Quick Control Screen. By default the SET button is disabled. This seems like a waste. When CFIII-3 is changed from default, the Multi-Controller joystick loses its ability to quickly activate the quick control screen. This makes the quick control screen more difficult to activate. Reassigning the SET Button to activate this function allows the quick control screen to once again be easily activated and used. Customizable My Menu At first I thought this menu was a waste of time, but as I used the camera I noticed I was often using functions that were buried in the menu structure and it got a bit annoying. I then began to add these functions to My Menu for quick access. It worked great. Now I really love this feature; again, little things that make the camera a pleasure to use. Here is how I have My Menu set up on my camera andwhy.
Format – This is something I do all the time and I keep it as my first function. It is now very quickly accessed. It is by default located in SetUp Screen 1 as the third item, but heck if I can ever remember that when I’m out shooting.
Mirror Lockup – Can’t remember where it is located by default and I’m not even going to look. It is easily accessible in the second position of My Menu.
Highlight Alert – I always turning this off because it’s annoying to see those blinking highlights when you’re just trying to enjoy reviewing your photos. On the other hand I’m constantly turning it back on to review shots right after I took them too see what highlights are blown. It’s nice to have it in an easy to remember location. It’s easier then remembering it’s located in Playback screen two.
AF Point Display – Same reasons as Highlight Alert above.
Highlight Tone Priority – I have this off by default because I’m not 100% sure of any negative impacts on the image and I’m a bit concerned that I can accomplish the same thing with better results in Photoshop. I put it in My Menu because I plan on testing it out and doing some comparisons. I have a feeling I will eventually use it. If it wasn’t in My Menu, I’d likely forget it was an option and end up never using a possibly very useful feature.
Beep – Every once in a while I want to turn the auto focus confirm beep off, but it I do it so rarely I always forget where it’s located. I usually end up not turning it off and taking the shot because I’m worried I’ll miss the moment while fumbling around. It is nice to have this in my menu so I don’t need to fumble around and can actually quickly do what I want to.
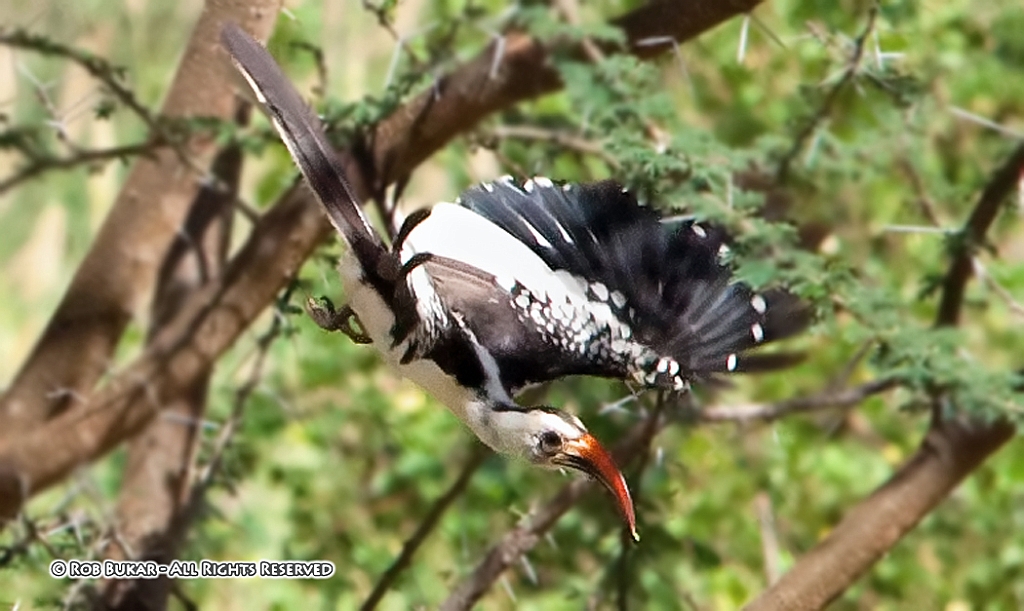
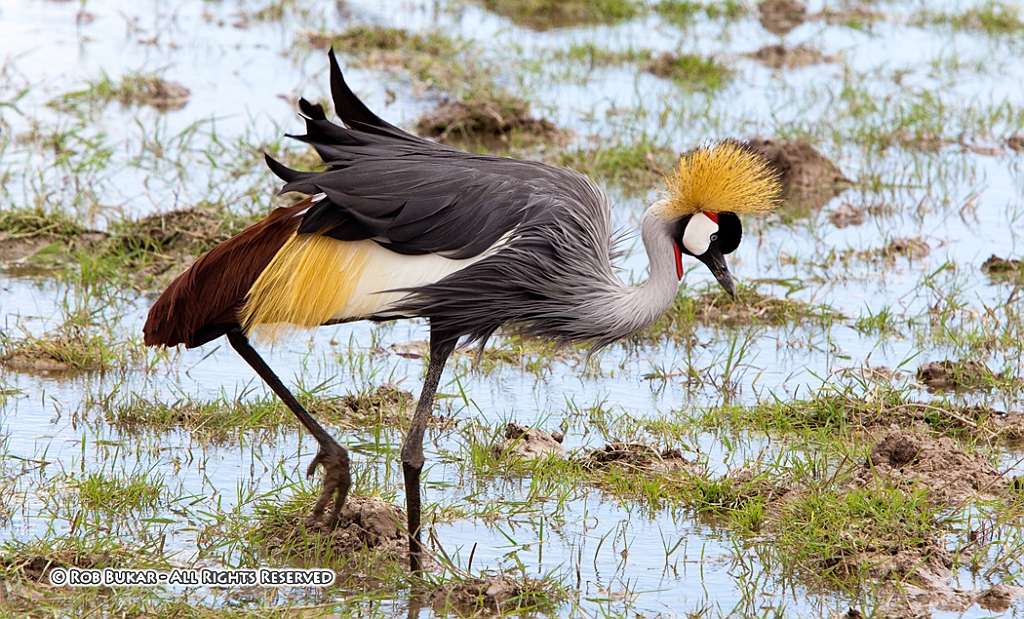
Custom Control on Command Dial I only started using this feature towards the end of my trip. As I started getting an excessive number of shots of elephants and zebras, I started becoming interested in taking some cool looking birds that were flying around. What kept happening is that I kept my camera set at lower ISO, one shot focus, evaluative metering, etc. in the hopes of capturing that amazing lion shot, but when I noticed a bird I wanted to shoot, it took a bit of time to change the settings to focus tracking, center point only, spot metering, and high ISO, fast shutter speed, which is a more appropriate setup to take birds in flight. By the time I was done fiddling with the camera I lost the shot. Alternatively, in my rush to change the settings, I forgot one. There was even a time where I had mirror lockup enabled because of some early morning shooting, and this didn’t work out well when trying to shoot some quick moving objects. Taking the time to think about what settings I wanted to shoot a bird in flight, setting them, as well as ensuring some settings were turned off (mirror lockup) and saving them to Custom Control 1 on the command dial was a great solution. I notice an interesting bird, switch to custom 1 and adjust shutter speed to allow enough light if necessary. When I was done, switched back to Shutter Priority and all my settings were as I left them. It worked out very nicely, though I must admit I didn’t capture any great photos of birds in flight as I didn’t have a long enough lens, and the 5D Mark II auto focus tracking may not be ideal for this type of work. It was fun though. Below is my best bird in flight photo from the trip. I set Custom Control 2 on the command dial for settings I thought would be useful when shooting macros, such as ISO 100, f10, mirror lockup, etc. This is convenient, but probably not very critical since when shooting macros on a tripod I usually have a lot of time to contemplate my settings and retake a photo if I realized I forgot to change a specific setting.
Light Metering I don’t have a lot to say regarding the light metering on this camera. It worked great. I used both evaluative and spot metering and they both seem to work great. Spot metering was incredibly useful for shooting the animals, especially at long distances. The animals could have easily been underexposed, as evaluative metering will expose for the scene, but the spot metering worked great and achieved the exposure I was looking for. Check out the photo below, though I did open it up even more in Photoshop. Evaluative metering worked just as well when used for the appropriate situation.
Live View I did not get a chance to really use live view to shoot pictures. I plan on utilizing it for macro shooting on a tripod, as it seems like a great way to manually focus and frame the photo. I also believe the two grid display options will be highly useful. I did use the live view in a more unconventional way. When on safari there were times things were going on way out in the distance. Sometimes it was difficult to let my wife know exactly where an animal was so she could spot them with her binoculars. Also, because we only had one pair of binoculars it was hard to share in the vision and discuss it. I ended up using Live View and 10X magnification as a live view video screen of the action way in the distance. It wasn’t as powerful as our binoculars but it was a great way for us to both view something off in the distance and discuss it as we watch the screen. It’s certainly no substitute for binoculars, but it was a cool way to view far away action together. Movie Mode I didn’t take very many movies on this trip, but after viewing the videos I did shoot I discovered just how bad I suck at shooting movies, and it wasn’t the cameras fault. I had never shot a movie in my life before this trip, never owned anything that could shoot video. I obviously had no concept of the techniques needed to shoot a good video. I fussed around with zoom too much and panning, and panning too quickly. I suggest a lot of practice if you have no experience. I surely need the practice. The video shooting was fun, and I hope to get better. The microphone is useless if there is any wind as it easily picks it up, and if you plan on focusing or zooming, it picks up every movement of the lens rings, so your sound will be ruined if you don't buy an external mic I suppose. Movies will not play back properly on my old Powerbook 1.67GHZ with 1.5 GB RAM. I need to use my wife’s MacBook to view the movies. I guess this camera may force me to purchase a new computer.
Battery Life Battery life was amazing. I never once used my second battery on the whole trip, even though I used Live View a lot, shot movies, and shot hundreds of pictures a day. Camera Feel I loved the feel in my hand, though it got a bit heavy after long use with the 70-200 2.8 and 1.4x extender. Auto Focus I am hesitant to say a lot about the auto focus abilities of the 5D Mark II as I have no experience with a pro auto focus system so I don’t really have a good frame of reference. Auto focus seemed fast and accurate in One Shoot mode. I used AI Servo mode to shoot birds flying and none of my pictures were tack sharp. I am not an expert bird photographer, I don’t have the appropriate high-powered lenses, and I have never used a pro camera, so I have nothing to compare my experience with. All I can do is report what I observed. I had some trouble getting auto focus to lock onto the even black matte hair of the gorillas when shooting in very low light (ISO 6400, F2.8, 1/80) I estimate auto focus could not achieve focus lock under these conditions about 4% of the time. It was quite annoying when it happened as I will likely never visit the silverbacks again, and I wanted ever press of the shutter to count, but I have no idea if any other camera on the market would have performed better. When I attempted to focus on the gorillas face, which had varying contrast and texture I never once had a problem. Overall, I was satisfied but not blown away by the 5D Mark II’s auto focus capabilities. Other things
1) Picture Style – I always left set to Standard
2) Program, Auto, and Creative Auto Modes – I never use them
3) Peripheral Illumination Correction – I always have this set to on. Why not? Makes it that much nicer when utilizing jpegs.
4) Weather sealing - Weather sealing has never a big thing for me personally. I don't shoot professionally, and if I purchased a $5000 plus pro camera with full weather sealing, I'd still be too nervous to push my luck more then I have with my 10D or 5D MII. Professionals I assume sometimes have no choice except to shoot or risk losing a paycheck so for them the extra security the full weather sealing provides is more of selling point then for me.
I can tell you my personal experience with weather and my cameras. We did have a bit of rain in Rwanda on the hike down from seeing the gorillas. It was a moderate to light rain that lasted only 10 minutes or so. I personally was not in the mood to push my luck. I walked for a few minutes with the camera out in the rain, but tucked it under my fleece. I took a couple of shots while it was lightly raining. When the rain got a bit heavier I put the camera away into my bag. There was a second day when I was shooting a "cultural show" again in light rain. I kept shooting, but tucked the camera under my fleece when I wasn't shooting to protect it. Haven’t had problems as of today. For perspective my wife was using her XTi and did the exact same thing in both situations and also hasn't had a problem. The Kenya safari was quite dusty. The camera was coated a few times in dust. I wiped it off once, and then gave up, as it is just very dusty out there. The camera is functioning fine. Again, my wife used her XTi under the same conditions and is also not having any problems. I'm not sure you can draw much conclusions from this. I had taken my 10D on safari in Tanzania 4 years ago. I shot some pictures in the rain, and the camera was coated with dust. I had the 10D from the time it was released, I would guess getting close to 6 years now? I used it here and there in light rain, and I bunch of times in dusty conditions, like the desert, beaches, etc. I brought it to many countries over the years, rain and dust on many trips, you can check out my travel section on my website, to see how many. I would say many beaches for sure. Anyway, the 10D held up until now with no weather sealing, with the exception of the popup flash, which stopped popping up about 18 months ago. The popup flash on the 10D was rather useless for me, as it didn't pop up high enough and cast a shadow from some of my lenses when shooting wide, so I didn't really care. (The pop up flash height was extended starting with the 20D to solve this shadow problem.)
5) User Interfaces and Menu Setup - Very well done and easy to use.
6) Supplied Software – I never use it. I use Photoshop for photos and plan on using iMovie for movies, though I haven’t tried editing my movies yet.
7) FPS – 3.9 is good enough for me. More is always better, but it’s not my primary concern.
8) IrPort - I like the addition of the IrPort on the front of the camera so the inexpensive remote shutters can be used to take family photos easily.
9) Battery Life - Battery life was amazing. I never once used my second battery on the whole trip, even though I used Live View a lot, shot movies, and shot hundreds of pictures a day. Kind of a waste of the $80 I spent on the backup battery.
10) I shot everything Full Raw + Large JPEG. Most images are so perfect out of the camera, I will not need the RAW as no manipulation is needed except cropping. This is a huge changed from my old 10D.
11) I loved the feel of the camera in my hand, though it got a bit heavy after long use with the 70-200 2.8 and 1.4x extender.
12) Minor Bug - On two occasions photos stopped showing up for preview automatically after shooting. I had to turn the camera off and on again to get it to show up automatically again. I have seen this bug reported by one other person. Don't know if it has been addressed in the recent firmware upgrade. Anyway, this bug is very minor to me.
Final Summary - Well I think I pretty much said it all. I think the combination of the feature set, build quality, usability, and 22 megapixel sensor at the current price point makes for the perfect camera choice if it's within your price range and you can benefit from all, or most, of the above. Check below for a few other photos shot with the 5D Mark II.